Use the wrong version of your headshot online and it can appear, blurred, faded and lose vital ‘impact factor’. Make sure your shots shine with Michael Wharely’s tips.

Since the dawn of digital, the different ways that photos function online and in print have been muddling us and the acting business isn’t immune.
– Agents often ask for ‘high res’ file, really meaning ‘a file that will look good on our website’.
– Actors often upload a print-ready file to Spotlight Link, mistaking large file-size for best quality online
– And plenty of photographers supply only print-ready photos, when a web-optimised version is essential.
So, without getting boringly technical, I thought it might be useful to commit to blog the best-practice tips I give clients on ensuring their headshots shine online.
Plus, I’ve chatted to the production department at Spotlight, and the chaps at Casting Call Pro and CNI UK for tips to help get the most out of portfolios on these sites, and others like The Page UK.
We all know that Spotlight Link, CCP and recently CNI UK dominate the pre-audition mechanics of casting. In making the online CV such a major promotional tool for actors, they’ve made the headshot primarily an a electronic phenomenon, which means you absolutely need web-tailored versions of your shots ready for online use.
This is simply a case of using the right version of the photo for the right job.
Web-Ready vs Print-Ready
When a photographer or retoucher finalises your shots, they should edit and optimise different versions of each photo for the different jobs it has to do.
 Print-Ready:
A properly print-optimised version of your photo will look beautiful when it is printed out.
But it’s not edited to be seen online.
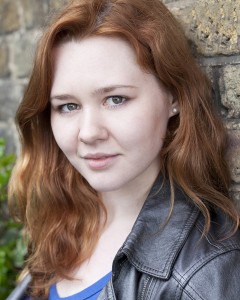
When viewed on a computer screen, iPad or smartphone, it can appear
– blurred
– drained of colour (or contrast if it’s B&W)
– pretty all-round unsatisfactory
See photo, right, for example
If colour balance is suffering, then we risk losing the subtleties of skin tone, eye-colour and hair shade made possible by the arrival of colour headshots.
And why have have less-than-perfect versions of hard-won headshots advertising to casting professionals?
Web-Ready:
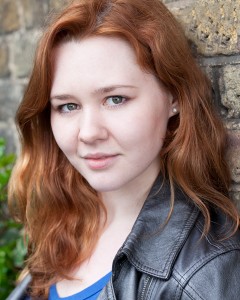
View the same photo in a web-optimised version and it should appear
– sharp and crisp
– more vividly and subtly coloured
– much more eye-catching.
See photo, right, for example.
What to use, when:
You should be getting (or asking for) both web-ready and print-ready versions of each retouched photo from your headshot session.
Here’s what to use when (and if you need to specify, what to ask for):
Web-ready
The Tech Spec: a) 72 dpi (that’s the number of pixels per inch), b) nothing less than 800 pixels long on the longest edge, preferably 1000 or more c) extra sharpening of the image for crispness and clarity d) In the sRGB colour space (vital for colour shots to look good online). e) in a not-too-compressed jpeg or gif file.
Err, and that means? An image with a file size of somewhere between 400KB and 1MB; small enough to email easily and download quickly; optimised to look great on screens; enough detail to print out decently on a standard home or office printer.
Might get called: low res, medium res, web-ready, web-optimised, sRGB.
When should I use it?: Anywhere the image will appear online; for emailing, for your Spotlight Link, CCP or CNI UK profiles, for personal website and social media profiles.
Print-ready
The Tech Spec: a) 300dpi (this is a commercial print-standard) b) Large size, actually 10 inches x 8 inches in size is good c) In a print-optimised colour profile like Adobe 1998 d) in a jpeg or TIFF format
Err, and that means?: An image with a file size of somewhere from 4-6MB. Still emailable, but very detailed and tuned for any professional print purpose.
Might get called: high res, print-ready, print-optimised, detailed.
When should I use it?: Anywhere the photo needs to be used for in professional print: when you submit your entry for the Spotlight book; when you have hard copy 10x8s made; for theatre programmes etc…
How can I tell the difference:?
Hopefully the files will be named to help you tell the difference, but if not:
a) The Size Test – look at the file size: a web-ready file will be much smaller, with a file size in the hundreds of KB, or around 1 MB
b) The Sight Test – flick between versions of the same shot: the one that looks crisp, clean and vibrant on your screen is the web-ready version.
What else do you need to know?
1) Spotlight Link vs Spotlight Book:
Spotlight’s production desk takes the print-ready file you submit for the printed book and runs it through a rough automatic process to make it a web-ready image suitable for your Spotlight Link profile
BUT this process doesn’t happen when you upload photos yourself to your Spotlight Link profile, or to Casting Call Pro.
Anyway, it’s far better to have a carefully edited, web-optimised version, not an automatically converted image.
In short: always upload web-ready images to your online portfolios.
2) How large the image appears on-screen:
All casting sites have users worldwide, using all sizes of screens, all types of browsers and all manner of devices, from iPhones to widescreen PCs, from Firefox to Internet Explorer.
Plus these sites need search results and online cvs to look uniform.
So, a piece of code in their website design limits the proportions of your headshot when it appears online.
This constrains how long and wide the image will appear on screen, but doesn’t fundamentally change the size of the photo you upload.
on Spotlight, it’s a long-edge limit of 500 pixels
on CCP it’s a long-edge limit of 600 pixels
on CNI UK it’s a long-edge limit of 500 pixels
on The Page UK it’s a long-edge limit of 500 pixels
No matter how big the file you upload to these sites, the images won’t appear bigger than that. BUT:
Ease of use: it’s easiest to have one web-optimised image for all online uses – so stick to the tech spec above.
Your photos downloaded: CCP and CNI UK allow casting professionals or employers to download your photos, and that means they get the file you uploaded. So, it makes sense to upload versions that are versatile enough to print out decently on a home or office printer. Again stick to the ‘web-ready’ tech spec above.
And finally:
Really, it’s all as simple as using the right version of the photo for the right job. And you should expect to get those versions out of your session.
Have you got any comments or tips? Leave a comment below, or contact Michael directly.
Michael Wharley is a London-based headshot photographer & writer www.michaelwharley.co.uk
Follow him @MichaelWharley. Email michaelwharley@michaelwharley.com

Be the first to comment